Introduction
There’s something universally exciting about drawing a rocket. It’s one of those subjects that feels adventurous and futuristic, yet it’s built from shapes simple enough for a beginner to master in one sitting. If you’re drawing with a child, doodling in a notebook, or working on a more detailed illustration, a rocket is a rewarding subject to practice.
The trick to drawing a great rocket isn’t talent, it’s breaking the design down into basic shapes. A cone, a cylinder, a few triangles, and some circles are really all you need to get the classic rocket silhouette right.
In this guide, you’ll learn how to sketch a simple rocket using basic shapes, add details like windows and fins, and finish it off with shading, flames, and color. We’ll also cover style variations and fixes for common drawing problems. Grab your pencil and let’s get started.
Understanding the Basic Rocket Shape
Before you start sketching, it helps to break a rocket down into its core components. Almost every classic rocket design, If cartoonish or realistic, is built from the same basic parts.
- The nose cone: the pointed or rounded top section that cuts through the air
- The body: a long cylinder that makes up the main structure
- The fins: small triangular shapes near the base that provide stability
- The window: typically a circle or oval placed near the top of the body
- The exhaust or flame: the burst of fire and smoke at the bottom, showing the rocket in motion
Understanding these five parts means you’re really just drawing a combination of simple geometric shapes: a triangle or curve for the nose, a rectangle or oval for the body, triangles for the fins, and a circle for the window.
Real-world rockets, like those used in space exploration, tend to have more technical details such as stage separations, fuel tanks, and antennas. Cartoon rockets simplify these into a friendly, rounded shape most people recognize instantly. This guide focuses on the classic, recognizable rocket style, with tips for making it more detailed or more simplified depending on your preference.
The Basics of Good Proportions
A rocket drawing looks convincing largely because of proportion, not detail. A few guidelines will help your sketch look balanced from the very first lines.
Keep the body long and narrow. A classic rocket silhouette is tall and slim, generally about three to four times taller than it is wide.
Center the nose cone. The tip of the nose should align with the vertical center of the body, or your rocket will look lopsided.
Balance the fins. Fins should be placed symmetrically at the base and similar in size, since mismatched fins are one of the most common mistakes.
Place the window thoughtfully. A single round window near the top third of the body reads as a classic rocket window, while multiple small windows can suggest a larger spacecraft.
Leave room for the flame. If you’re adding exhaust or fire, sketch your rocket a little higher on the page to leave space below it.
Once your basic proportions are in place, adding detail becomes much easier and far less likely to throw off the whole drawing.
Before You Start: Choosing Your Style and Tools
Take a moment to decide on your approach, since a few small choices will shape how your final drawing looks.
Cartoon style. Rounded shapes, bold outlines, and bright colors make this style approachable and popular for kids’ projects or playful illustrations.
Realistic style. Straighter lines, more technical details, and careful shading suit this style, which works well for older students or detailed sketches.
Simple line style. A minimal outline without heavy shading is quick to draw and works well for icons, doodles, or quick sketches.
Choosing your tools. A pencil and eraser are all you need to start. Fine-liners or markers work well for clean outlines, and colored pencils, markers, or watercolors can bring the finished piece to life.
Paper considerations. Plain printer paper is fine for practice, while sketchbook paper holds up better to erasing and shading.
How long will it take? A simple rocket can be finished in 10 to 15 minutes, while a detailed, shaded version may take 30 minutes or more.
Supplies You’ll Need
Drawing a rocket doesn’t require much. Most of these supplies are things you likely already have on hand.
Core Supplies
- Pencil: for sketching the initial shapes and guidelines
- Eraser: for correcting lines and cleaning up your sketch
- Paper: plain or sketchbook paper both work well
- Fine-tip pen or marker: for outlining once your sketch is finalized
Optional Additions
- Ruler: helpful for keeping the body of the rocket straight and symmetrical
- Compass or round object: for tracing a perfectly circular window
- Colored pencils, markers, or crayons: for adding color to the finished drawing
- Watercolors or paint: for a softer, more artistic finish
- Blending stump or tissue: for smoothing pencil shading
Supply Notes
Use a light touch for sketching. Light pencil lines are easier to erase and adjust before you commit to your final outline.
Keep your eraser handy. Rockets rely on symmetry, so expect to make small adjustments as you go.
Test your colors first. If you’re using markers or paint, test them on scrap paper to check how the color looks before applying it to your final drawing.
Setup and Preparation
A little preparation makes the drawing process smoother and helps your proportions come out right from the start.
Prepare Your Workspace
- Find good lighting. Natural light or a bright lamp makes it easier to see your pencil lines clearly.
- Sit at a flat, stable surface. A table or desk gives you more control than drawing on your lap.
- Keep your supplies within reach. Pencils, erasers, and paper should all be close by before you start.
Set Up Your Paper
Position your paper vertically, since a rocket’s tall, narrow shape fits a portrait orientation better than landscape. If you plan to add flames or exhaust, leave extra space near the bottom of the page.
Sketch Light Guidelines
Before drawing the rocket itself, lightly sketch a vertical center line down the middle of your paper. This helps keep the nose cone, body, and fins symmetrical as you build up the shapes.
With your paper positioned and your guidelines in place, you’re ready to start drawing.
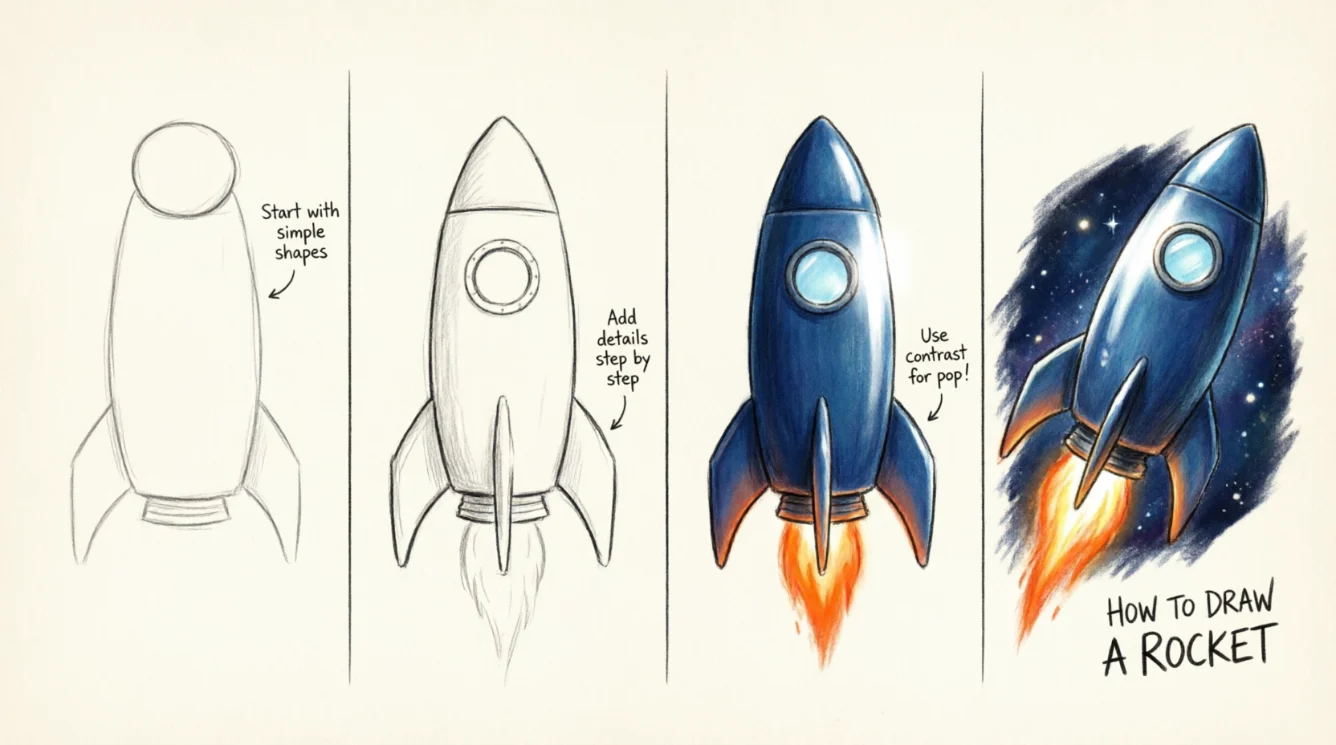
Step-by-Step: How to Draw a Rocket
This method builds the rocket from simple shapes, making it easy to adjust as you go. Set aside about 15 to 20 minutes.
Step 1: Draw the nose cone. Starting near the top of your center line, draw a rounded triangle or curved cone shape for the top of the rocket.
Step 2: Add the body. Below the nose cone, draw two parallel vertical lines extending downward, then connect them with a slightly curved or straight bottom edge to form the cylindrical body.
Step 3: Draw the window. Sketch a circle or oval near the top third of the body, centered on your guideline.
Step 4: Add the fins. At the base of the rocket, draw two or three triangular fins extending outward and slightly backward for a sense of stability.
Step 5: Refine the outline. Go over your pencil sketch, smoothing out curves and adjusting any uneven lines.
Step 6: Add the exhaust. Beneath the base of the rocket, draw a burst of jagged or wavy lines to represent flames, with soft cloud-like shapes for smoke.
Step 7: Ink your lines. Once you’re happy with the pencil sketch, trace over it with a fine-tip pen or marker.
Step 8: Erase pencil marks. Once the ink is dry, gently erase the remaining pencil guidelines.
Step 9: Add color and shading. Fill in your rocket with color, and add shading along one side of the body and fins to create a sense of depth.
Customizing Your Rocket
Once you’ve mastered the basic shape, you can adjust the design to fit your own style.
Adjusting the Style
- Cartoon rocket: exaggerate the roundness of the nose cone and body, and use bold, bright colors.
- Realistic rocket: add panel lines, small technical details, and metallic shading.
- Retro rocket: add fins that flare out more dramatically and a checkered or striped pattern on the body.
The Details
- Multiple windows: add two or three smaller circles instead of one large window for a bigger spacecraft look.
- Stage separations: add a horizontal line partway down the body to suggest a multi-stage rocket.
- Antennas and details: small lines and shapes near the top can add a more technical feel.
Adjusting the Motion
- Straight flight: draw the flame directly beneath the rocket for a simple launch look.
- Angled flight: tilt the entire rocket and adjust the flame direction to suggest movement across the sky.
- Adding stars or clouds: background elements can help place your rocket in space or in the sky.
Shading and Finishing Touches
Shading is what turns a flat outline into a rocket that looks like it has real form and depth.
Adding Basic Shading
Choose a light source, such as the upper left, and shade the opposite side of the body and fins slightly darker. This simple contrast creates the illusion of a rounded, three-dimensional shape.
Highlighting
Leave a thin strip of the paper’s white space, or use a white colored pencil, along the side facing your light source to suggest a shine or metallic highlight.
Coloring the Flame
Layer your flame colors from the outside in, starting with red or orange at the edges and blending toward yellow or white near the center, where the fire would burn hottest.
Adding Texture
Small curved lines along the body can suggest metal paneling, while a soft blending technique with colored pencils or a blending stump can create smoother gradients.
Background Details
Adding a few stars, clouds, or a simple horizon line can help ground your rocket in a scene and make the final piece feel more complete.
FAQs
Do I need to be good at drawing to start?
No. Breaking the rocket into basic shapes makes it approachable for complete beginners.
What’s the easiest way to keep it symmetrical?
Use a light center guideline and check both sides against each other as you draw.
Can I draw a rocket without a ruler?
Yes, though a ruler can help keep the body straight if you want a cleaner, more technical look.
How do I make my rocket look more realistic?
Add panel lines, subtle shading, and more technical details like antennas or stage separations.
What age is this good for?
This method works well for both young children and adults, since the difficulty level can be adjusted with more or less detail.
Conclusion
Drawing a rocket is a fun, approachable project that rewards a bit of planning more than raw artistic talent. By breaking the design into a nose cone, body, fins, window, and flame, you can build a convincing rocket from just a few basic shapes.
Remember the key points: keep your proportions balanced, use a light guideline for symmetry, and build up your shading gradually for a sense of depth. If you go cartoon-style or aim for something more realistic, the same core steps apply.
Once you’re comfortable with the basic shape, try experimenting with different angles, colors, and backgrounds to make the drawing your own.
Give this tutorial a try and share your finished rocket in the comments. Subscribe for more easy step-by-step drawing guides.

I am Jaxon Blake, the author of DreamZoons.com, where I explore the hidden meanings behind dreams. I am a dream expert, and I help people understand what their dreams may be trying to tell them.