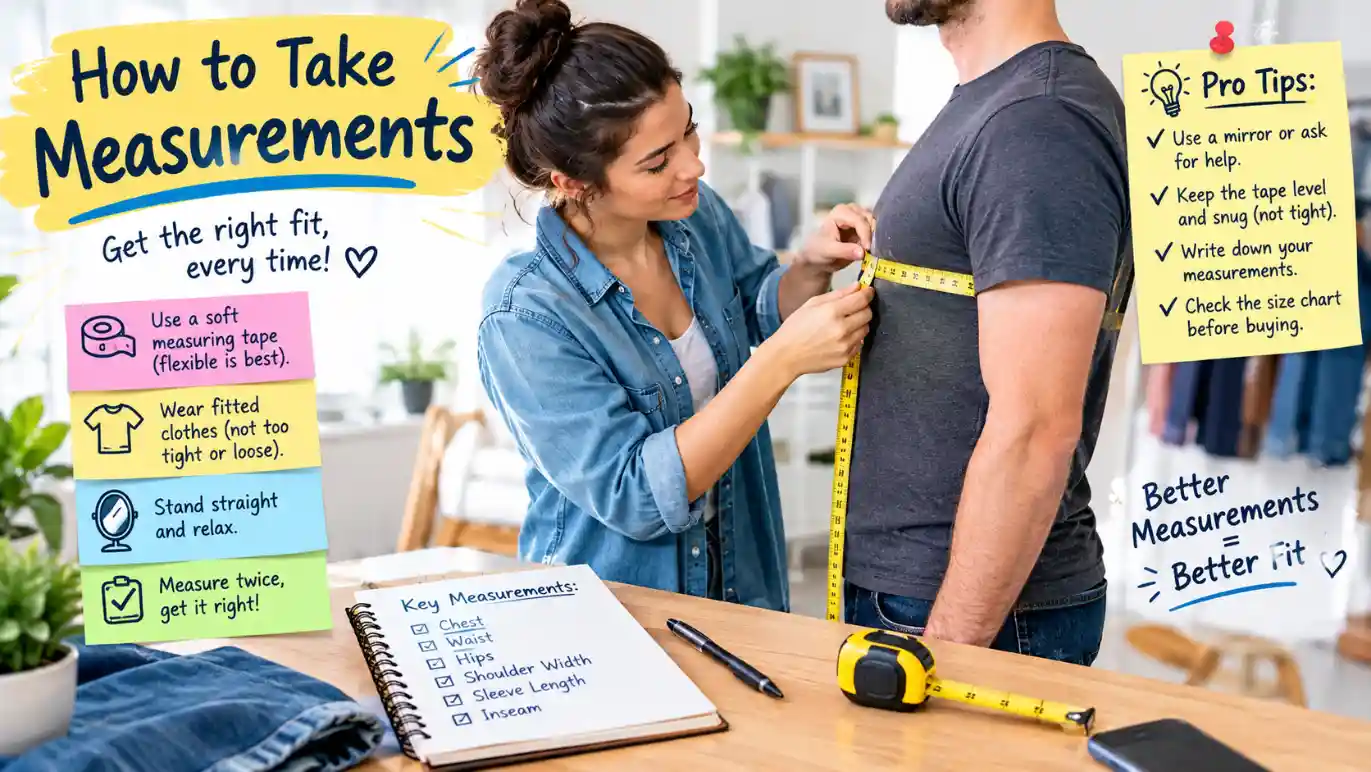
To take accurate body measurements, use a soft measuring tape and stand naturally with relaxed posture. Keep the tape level and comfortably snug without squeezing your body. Measure key areas such as your bust or chest, waist, hips, shoulders, sleeve length, and inseam. Record each measurement in inches or centimeters and use the numbers with the clothing brand’s size chart.
Key Takeaways
- Use a flexible measuring tape rather than a rigid metal tape.
- Stand naturally and avoid sucking in your stomach or holding your breath.
- Keep the tape level and snug, but never tight enough to compress your body.
- Measure twice when possible and record the numbers immediately.
- Always compare your measurements with the specific brand’s size chart.
What You Need to Take Accurate Measurements
Learning how to take measurements at home is easier than it sounds. For most clothing measurements, you only need a soft, flexible measuring tape, a mirror, and something to record your numbers.
Wear lightweight, close-fitting clothing or the undergarments you normally wear with the garment. Thick sweaters, jackets, and loose clothing can add extra space and make your measurements less useful.
Stand in a relaxed, natural position. Do not pull your stomach in, puff out your chest, or hold your breath. For measurements around your body, keep the tape parallel to the floor whenever possible.
The tape should touch your body without digging into it. In simple terms, snug is good; tight is not.
If possible, ask someone to help with measurements such as shoulder width or back length. A mirror can also help you check whether the tape has slipped or twisted.
How to Take Measurements Step by Step
The measurements you need depend on what you are buying or making. Bust or chest, waist, and hips are especially useful for many clothing size charts, while shoulder, sleeve, and inseam measurements become important for specific garments.
1. Measure Your Bust or Chest
Wrap the measuring tape around the fullest part of your chest or bust.
Keep the tape level across your back and front. Let your arms hang naturally rather than lifting them while someone measures you.
Take a normal breath and keep your body relaxed. The tape should rest comfortably against you without pressing inward.
Tip: Check the tape in a mirror to make sure it has not moved higher or lower at the back.
For shirts, dresses, jackets, and other upper-body clothing, this measurement can be particularly useful when comparing your body with a size chart.
2. Measure Your Waist
Your natural waist is generally the narrower area of your torso. One simple way to find it is to bend slightly to one side and notice where your torso naturally creases.
Wrap the tape around this area. Keep it level and relaxed.
Do not suck in your stomach. Doing so gives you a smaller number that may not represent how the garment will actually fit.
Also remember that your natural waist is not necessarily the same place where you wear your pants. If a clothing brand specifically asks for a waistband measurement, follow that brand’s instructions.
3. Measure Your Hips
Stand with your feet together and wrap the tape around the fullest part of your hips and seat.
Look in a mirror or ask someone to check the back of the tape. It should remain level rather than dipping or rising.
This measurement is especially helpful when buying pants, skirts, fitted dresses, and other garments that need room around the lower body.
If your waist and hip measurements fall into different size ranges, don’t automatically choose based on the label you usually wear. Compare both numbers with the brand’s size chart.
4. Measure Your Shoulders
Shoulder measurements are useful for shirts, jackets, coats, blazers, and tailored clothing.
Measure from one shoulder point to the other across your upper back, following the natural line where a shoulder seam would normally sit.
This measurement can be difficult to take accurately by yourself, so a helper is useful.
Keep your posture relaxed. Pulling your shoulders backward or pushing them forward can change the measurement.
5. Measure Your Sleeve Length
For sleeve length, start at the shoulder point and measure along the outside of your arm toward the wrist.
Keep your arm relaxed rather than rigidly straight.
Some clothing brands may use a different method, such as measuring from the center back of the neck to the wrist. Always check the instructions supplied with the particular size chart or garment.
6. Measure Your Inseam
The inseam is the inside length of your leg.
For clothing, measure from the crotch area down the inside of your leg to the point where you want the pants to end.
Your desired inseam can change depending on the style of pants and the shoes you plan to wear. Jeans, trousers, cropped pants, and athletic clothing may all have different preferred lengths.
When buying pants online, check whether the seller provides a body inseam or a garment inseam. They are not always the same thing.
7. Measure Your Neck
To measure your neck, place the tape around the base of your neck where a shirt collar would normally sit.
Keep the tape comfortably snug rather than pulling it tightly against your skin.
If you’re measuring for a dress shirt, follow the retailer’s instructions because some sizing systems include additional room for comfort.
How to Take Measurements by Yourself
You can take many measurements without another person, although a helper can improve accuracy.
Start in front of a full-length mirror. Hold the measuring tape with one hand and use the mirror to check whether it is level.
For measurements around your body, join the ends of the tape without twisting it. Read the number while keeping your posture natural.
For hard-to-reach measurements, take several readings rather than forcing the tape into an awkward position.
A simple routine is:
- Prepare your tape and recording method.
- Put on thin, fitted clothing or suitable undergarments.
- Stand naturally.
- Measure each area once.
- Repeat important measurements.
- Record the final numbers.
- Compare them with the relevant size chart.
Taking measurements consistently is often more important than trying to achieve an extremely precise number from one session.
How to Measure Without a Tape Measure
Don’t have a measuring tape? You can use a piece of non-stretch string, ribbon, or similar flexible material.
Wrap the string around the area you want to measure and mark the point where the ends meet. Then lay the string flat and measure it against a ruler or another straight measuring tool.
The material should not stretch while you are measuring. Otherwise, the final number may be inaccurate.
For clothing, however, a soft measuring tape is the easiest and most practical option.
Body Measurements vs. Garment Measurements
One common source of confusion is the difference between body measurements and garment measurements.
Body measurements are measurements taken directly around or along your body.
Garment measurements are measurements taken from the actual piece of clothing.
For example, an online listing might give the chest measurement of a shirt rather than the body measurement it is designed to fit.
This distinction matters because clothing usually includes some amount of ease. A shirt with a 40-inch chest measurement does not necessarily mean it is designed for a person whose chest measures exactly 40 inches.
When a retailer provides a size chart, read the instructions carefully before comparing your numbers. Some brands list body measurements, while others list garment dimensions.
Common Measurement Mistakes to Avoid
Even a good measuring tape cannot produce useful results if you use it incorrectly.
Here are some common mistakes to avoid:
Pulling the tape too tight: This can make your measurements smaller than they really are.
Letting the tape twist: A twisted tape can change the reading.
Measuring over bulky clothing: Thick fabric adds extra space.
Holding your breath: Your body naturally changes as you breathe.
Sucking in your stomach: This produces a measurement that may not represent your normal shape.
Standing unnaturally: A stiff posture can change several measurements.
Measuring at the wrong location: For example, your natural waist and the place where your pants sit may be different.
Using an old measurement: Your measurements can change, so don’t assume a number from years ago is still accurate.
Ignoring the size chart: Clothing sizes are not perfectly standardized across brands. Use your actual measurements as the starting point instead of relying only on a familiar size label.
How to Use Your Measurements With a Size Chart
Once you have your numbers, find the clothing brand’s official size chart.
Look for the measurements that apply to the garment. A dress may use bust, waist, and hip measurements, while pants may focus more heavily on waist and inseam.
Suppose your measurements are:
| Measurement | Your Size |
| Bust/Chest | 38 in |
| Waist | 32 in |
| Hips | 40 in |
| Inseam | 30 in |
Don’t simply search for one universal clothing size. Compare each measurement with the specific brand’s chart.
If you’re between sizes, check the brand’s fit notes. A loose garment may accommodate more variation than a fitted garment, while structured clothing may require closer attention to the shoulders and chest.
The key idea is simple: your measurements are more useful than the size printed on a previous piece of clothing.
Simple Body Measurement Checklist
Save this checklist if you regularly shop online or work with a tailor:
- Bust or chest
- Waist
- Hips
- Shoulder width
- Sleeve length
- Inseam
- Neck
- Height
- Preferred garment length
You may not need every measurement for every purchase. Start with the measurements requested by the clothing brand, tailor, or pattern.
For fitness tracking, the measurement locations can be different. For example, people may track areas such as the abdomen, arms, thighs, and calves. When tracking changes over time, consistency in the location, posture, and measuring method helps make comparisons more meaningful.
Frequently Asked Questions
How do I take my own measurements?
Use a soft measuring tape and stand naturally in front of a mirror. Measure your bust or chest, waist, hips, and other areas required for the garment. Keep the tape level and comfortably snug. Repeat important measurements and record them immediately.
Should I measure over clothes?
For the most useful clothing measurements, wear thin, close-fitting clothing or appropriate undergarments. Avoid bulky sweaters, jackets, or loose layers because they can add extra space and affect the result.
How tight should the measuring tape be?
The tape should sit comfortably against your body without squeezing or compressing it. You should not need to pull the tape tightly to keep it in place. Think snug, not tight.
How often should I take my measurements?
It depends on why you’re measuring. For clothing, update your measurements when you notice a meaningful change or before ordering an important fitted garment. For fitness tracking, use a consistent schedule and the same technique each time so that your numbers are easier to compare.
Conclusion
Knowing how to take measurements correctly can make clothing shopping, tailoring, sewing, and tracking body changes much easier. You don’t need complicated equipment. A soft measuring tape, a mirror, and a few minutes are usually enough.
Start with the measurements that matter most for your purpose, such as bust or chest, waist, hips, shoulders, sleeve length, or inseam. Keep the tape level, stay relaxed, and avoid pulling it too tightly. Most importantly, compare your numbers with the specific size chart or measurement instructions you’re using.
Once you have an accurate set of measurements written down, you can reuse them whenever you shop online, order custom clothing, or need to check your size.

I am Jaxon Blake, the author of DreamZoons.com, where I explore the hidden meanings behind dreams. I am a dream expert, and I help people understand what their dreams may be trying to tell them.